In one of the previous articles I described how to install nextcloud. If you want extend functionality to online editing XOffice (Open & M$) documents you need to install Collabora service.
Install additional fonts
Install (on Debian) additional MS fonts. New fonts will be available on /usr/share/fonts directory.
apt-get install ttf-mscorefonts-installerDocker compose
You should add appropriate section on the end of docker compose file. My custom Collabora service is based on collabora/code and btstream/collabora-fonts. The main feature is the possibility of adding custom font from external directory. Just mount the volume.
version: '2'

volumes:
  nextcloud:
  db:

services:
  db:
    image: mariadb:10.3.14
    restart: always
    volumes:
      - ./data/db:/var/lib/mysql
    environment:
      - MYSQL_ROOT_PASSWORD=$ENV_MYSQL_ROOT_PASSWORD
      - MYSQL_PASSWORD=$ENV_MYSQL_PASSWORD
      - MYSQL_DATABASE=nextcloud
      - MYSQL_USER=nextcloud

  app:
    image: nextcloud:15.0.8-apache
    ports:
      - 50020:80
    links:
      - db
    volumes:
      - $ENV_APP_HTML:/var/www/html
      - $ENV_APP_DATA:/var/www/html/data
      - $ENV_APP_CONFIG:/var/www/html/config
      - $ENV_APP_APPS:/var/www/html/apps
    restart: always

  collabora:
    image: mrcnpdlk/collabora-custom-fonts:1.0
    restart: unless-stopped
    environment:
       - domain=mydomain.com
       - username=admin
       - password=some_password
    volumes:
       - /usr/share/fonts:/usr/share/fonts/Custom
    ports:
      - 127.0.0.1:9980:9980
After starting of services wait one or two minutes – collabora image starts long time.
Nginx configuration
Collabora is started on localhost without SSL, because of that I am using Nginx to add SSL. Add config to site-enabled directory.
server {
listen 9081 ssl http2;
listen [::]:9081 ssl http2;
ssl_certificate path_to_cert;
ssl_certificate_key path_to_key;
server_name my_server_name;
access_log /var/log/nginx/access.log;
error_log /var/log/nginx/error.log;
large_client_header_buffers 4 8k;
location ^~ /loleaflet {
proxy_pass https://localhost:9980;
proxy_set_header Host $http_host;
}
# WOPI discovery URL
location ^~ /hosting/discovery {
proxy_pass https://localhost:9980;
proxy_set_header Host $http_host;
}
# Capabilities
location ^~ /hosting/capabilities {
proxy_pass https://localhost:9980;
proxy_set_header Host $http_host;
}
# main websocket
location ~ ^/lool/(.*)/ws$ {
proxy_pass https://localhost:9980;
proxy_set_header Upgrade $http_upgrade;
proxy_set_header Connection "Upgrade";
proxy_set_header Host $http_host;
proxy_read_timeout 36000s;
}
# download, presentation and image upload
location ~ ^/lool {
proxy_pass https://localhost:9980;
proxy_set_header Host $http_host;
}
# Admin Console websocket
location ^~ /lool/adminws {
proxy_pass https://localhost:9980;
proxy_set_header Upgrade $http_upgrade;
proxy_set_header Connection "Upgrade";
proxy_set_header Host $http_host;
proxy_read_timeout 36000s;
}
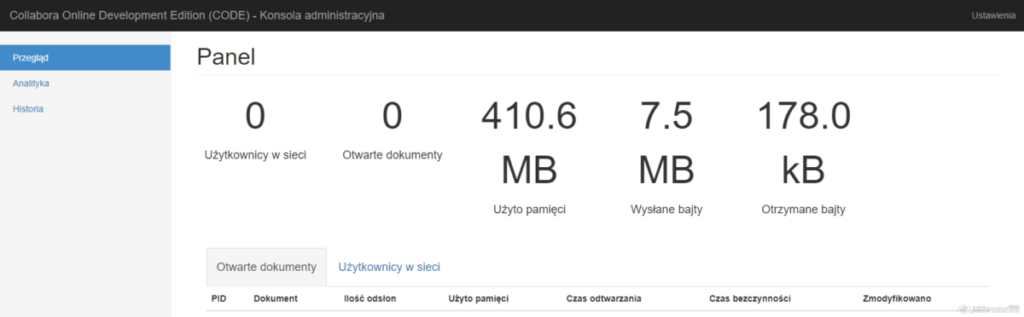
}Now, the collabora service is listening on 9081 port of my server with some public IP, for example 1.1.1.1 on domain mydomain.com.
If everything is correct, you will be able to login into admin page: https://mydomain.com:9081/loleaflet/dist/admin/admin.html
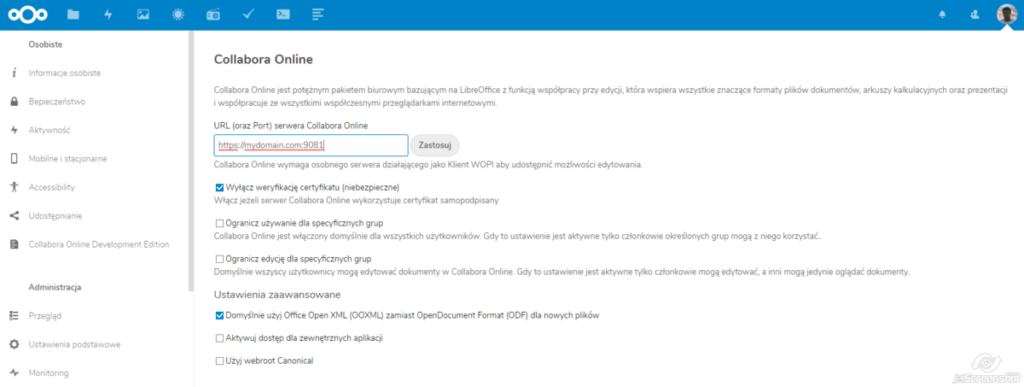
Nextcloud configuration
Next step is very easy. Just install Collabora Online app on the Nextcloud and configure it. Set url service: https://mydomain.com:9081 and disable checking SSL if you have self-signed certificate .
Worpress v5